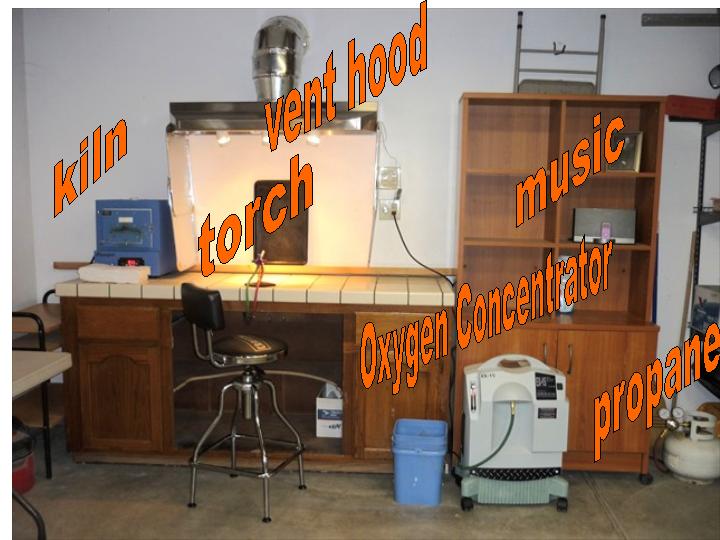
Arrow Springs finally got the GTT Lynx torch I ordered a while ago, I have been super excited about getting the stuff (torch, regulator, hoses, etc) and went up there Monday to pick it up in person. I'm still waiting for a few more items to get hooked up in the garage, mainly the ventilation fan and hood, so cannot actually start running the torch at home, probably until this weekend. The kind people at Arrow Springs could see how eager I was to get going and make good use of my vacation time and they let my use their Lynx in the open studio (for free, shush, don't tell). This is a picture of the beautiful little torch.
I know I shouldn't be concerned about looks, and truly I did choose this type of torch for the technical specs, but as an added bonus, she really is a beaut!
In the Arrow Springs studio I got all set up at the torch, carefully sorted all my glass by size and color, got the frit (small crumbles of glass, like breading) all ready to go, picked out some interesting tools and started making the first fish. There was another lady there working on soft glass, she inquired what I was working on and what kind of glass it was. I responded that the glass was borosilicate, she then asked about my safety glasses and of course I explained what I using. Suddenly she muttered something to herself, got up in a snit and informed the people at Arrow Springs that they needed to move me as the color of the flame was hurting her eyes! Mind you, she didn't actually ask
me to move, no, she simply demanded that the shop do it! Argh, the nerve, I was halfway into fishy and quite happy thank you, when the shop dude apologetically talked to me and moved all my stuff. To his credit he did it all lickety split and with a smile. He also patiently answered all my dumb, newbie questions with a veritable wealth of glass color chemistry knowledge, thanks Joe!
After I got over my irritation, it was all good and we even struck up a decent conversation about what we each were making (but in my head, I still think she was a bit too much of a princess about the torch, I mean really, if the light hurts your eyes, DON"T LOOK AT IT!!)
So, anyway I had a grand time making little fishies. All of them are made from borosilicate glass (AKA Pyrex) using
Glass Alchemy colored rod and frit.
First, I used clear glass to make the fish body, mashed it into the Exotic Red frit, then added the fins with Ruby Strike glass (strike means it changes color in different heat profiles). I might try to strike this again in the kiln as the red came out kind of an icky liver color in a few small areas. I had some trouble making the tail as the top and bottom fin edges got in the way. Perhaps next fishy I make I'll try adding the tail fin first, then the top and bottom. Also, this guy has huge and somewhat uneven bubble eyes as I had trouble getting them centered and kept adding glass to try to even them out. The effect was kind of the opposite of a bad home haircut. Come on, you know you've all done it, cut a little more off this side, then, "oh damn, the other sides too long now" and so on until you're cropped like a Marine!
I dub this one "Whistling Dixie"
Mr. Dixie is your basic management type, you know the one who is always spinning the bad news to make it sound good. His last "inspirational" speech at the office was about how layoffs were really a good thing as it meant production was getting more efficient, thanks to all the good ideas of the workers (and he didn't get the irony of that statement :)
At this point Joe came over the check on me and directed me to a cool tool that pokes indentations evenly on both sides of a piece, perfect for marking where the eyes should be! This next fishy was made with Multi-Color frit and Kryptonite color fins. I am pretty happy about his fins, I still had trouble with the tail, but I like the transparent color.
and, of course, he shall be named "Clark" for obvious reasons
Clark likes a good party, for sure, but he knows when to get serious and is a good guy to have around in a pinch.
And, finally this fish, he was a pain in the a**, for sure. I must have been getting tired, because he was the hardest by far even though I used the same techniques. The Green Carnival fins were stiff and just wouldn't flow on like I wanted. I poked a hole in him so he could be hung as a sun-catcher, then forgot to add eyes before attaching the punte (little holder rod), not a big deal, but when the punte cracked off unexpectedly he crashed to the table and the tail cracked off, aahh!! So now I had to grip him tightly with tweezers to re-attach the tail, make the eyes and mouth while not burning the crap out of my fingers. Mission accomplished, but in my frustration and fatigue I forgot where the hole was and made the eyes, etc. upside down. Now he has a useless hole in his belly.
And so he will be known as Butch
Butch is an ex-con (did a dime for aggravated assault at Pelican Bay) who works as a carnie now for local Cirque Du Soliel wannabe outfit. He runs the coin toss booth and feels no shame about consigning his goldfish buddies to an uncertain fate in the grubby little hands of the punky kid winners.
So long, happy swimming in the stream of life