Tuesday, April 26, 2011

Frittering the time away

Frit is the name for small crumbles of glass (can in size range from powder all the way up to rock salt size).  It comes in as many colors and combinations as anyone can dream up.  It's a fun and really simple way to add some spots or swirls of color to beads.  I recently purchased 10 small jars from a fellow lampworker trying to "destash".  I tried each one on a base of regular clear effetre (maybe some "superclear" as well).

Passion - round 12mm
 
Mystic - round 12mm

Blue Moon - oval 10 x 19mm

Ivory Granite - oval 9 x 14mm

Gypsy Skirt - disk 6 x 12mm


Rose Bouquet - UFO 16 x 18mm


Purple Salmon - cylinder 12 x 12mm


Desert Rose - lentil


Ruby Extra Gold over a pink base - oval 9 x 14mm

Amazing Grace over Effetre Grass Green - oval 10 x 19

these are Aurora shards (super thin sections of glass laid over the bead for a special color or texture effect), overlaid with some melted in pure silver wire and finished off with Moody Blue (metallic "sheeny" color) ends.
and my new personal favorite, simple, straight lines of various lengths overlaid with a sprinkling of enamel powder for a cool "ombre" or gradient effect.

Stay tuned for coming attraction as I will be making most of these into simple earring sets and maybe a necklace or two. If you have a personal favorite let me know and I'll give/send you something (limited time offer for family and friends only, on the off, off, off chance some anonymous stranger actually reads this :).

In a Pickle

I felt like a kid this weekend playing "Science Experiment" in the kitchen. 

I decided to get some solid silver wire for stringing my best beads (up till now I've been practicing with the silver plated wire from Michael's). After researching a little about silver wire, it looks like Argentium Silver is the way to go.  This is pure silver that's been doped with Germanium, which creates an anti-tarnish layer on the surface, also this silver alloy is nickel-free, meaning some people who are allergic to silver can wear this kind.

Another reason I wanted pure silver is to fuse the ends of the wire into balls to act as head pins for beads (otherwise I need a little loop or something at the end of the wire to keep the bead from falling off).  When you heat up metal it tends to discolor and one way to remove this discoloration is the "pickle" the metal in an acidic solution (yes, Google is an awesome tool). 

Experiment #1
It turns out you can do this with simple household ingredients like a vinegar (weak ascetic acid) and salt solution. I first tried this at room temperature and boy is it sloooooow, I left the piece in overnight and it was finally shiny by the morning, yes ... success, sort of.

But you all know I'm just not a terribly patient person, so "There must be a FASTER way" I cried as I headed to the local Second Hand store for a crock pot, and VOILA,

I present to you the "PICKLE POT"
notice the very professional and safety conscious signage, no food, no, not ever again.

Experiment #2
As one of the goals was to melt a ball on the end of the wire to hold a bead with a 1/16" hole in it, I wanted to try in a couple of gauge wires to see how big each gauge allowed.
I started with, from top to bottom, 16 gauge silver, 20 gauge silver and 20 gauge bronze (way cheaper than silver and so I just had to try it too).

hmm, lost a bit of the 20 gauge silver when I kept trying to make the ball bigger and then the whole damn thing would just drop right off the end of the wire onto the counter : (

close up of the discoloration, referred to as firescale

the bronze end fell off, not sure if this is normal or just my inexperience?  Anyway, here is the silver after only 2 hours in the hot vinegar/salt solution.
Oh yeah, baby, THAT'S what I'm talkin' about, Power to the Pickle Pot!

Saturday, April 2, 2011

Nightlife at the California Academy of Sciences

I do occasionally get out of the house, away from my latest obsession with glass (and I've got the pictures to prove it).  A friend from work, a graduate of Penn State, invited me to accompany her to a Penn State alumni night at the California Academy of Sciences this last Thursday.  The Academy offers an Adults only event called Nightlife weekly.
view from the living roof, the tall twisty building to the right is the DeYoung museum

We were pleasantly surprised it took only a little over an hour to get there from Vacaville, parking was easy to find and because this is a weeknight event there were no huge lines or crowds (that was actually the best part)!  They had some DJ and live music pumping through the open spaces, lots of options for food and beverages and all the exhibits were open AND free tickets to the Planetarium show, such a good deal!

We saw the 6:30 Planetarium show (spectacular) and afterward I was initially a little disappointed that we missed the opportunity to see the living roof, but actually it was totally cool to see the view at night.
looking out over the music concourse

We wandered around checking out the displays and spent a considerable amount of time in the Aquarium.
Our nominee for "Ugliest Fish in the Aquarium" (he didn't seem to mind, a guy's gotta eat right?  And this is good camouflage for an unsuspecting fish dinner).
and our nominee for "Coolest Creature in the Aquarium" (we were not allowed to photograph this light sensitive guy, but I pulled a photo off the internet to show you how totally cool this one is;
ah, the Weedy Sea Dragon, oh how I love thee, so elegant and graceful, so colorful and otherworldly gorgeous!

Other creatures of note:
the eels, sleek, sinuous and with a menacing sense of danger about them.


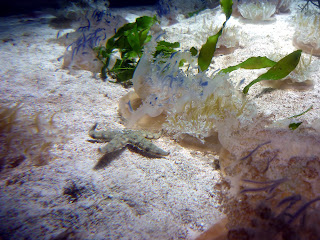
the upside down jelly fish, this one is reaching out a tentacle to check out the nearby starfish, hmm... friend or foe?


These frogs which look like aliens pondering how they got stuck in this strange glass world with giant faces peering at them all day and night

the albino American alligator, named Claude
I have fond memories of this enclosure from yearly school field trips, I'm sure this is a different alligator, but it sure does bring back those memories.  My best friend at the time got shelled by the seagulls during lunch and we had to perform some major hair clean up in the little bathroom sinks, all the while I was desperately trying to be sympathetic, while inside dying to laugh uproariously, good times, good times.

Tuesday, March 29, 2011

Sometimes simple is best

I've been practicing making dots on beads and liked this sort of restrained color combo of coral over ivory with little metallic black dots for accent. This shape is called lentil (bean maybe?) about 15mm diameter.  I used some head pins from Michael's with a pewter metallic tone for the earrings and pendant to match the little metallic glass dots on the beads.

These actually surpassed my idea of what they should be, then considering the solar system failure, I'm thinking it's just "win some, lose some". If I keep at it, there are bound to be some successes!

Sunday, March 27, 2011

and on the 14th day she made the solar system

This piece has been a blast to conceptualize and make, partly because it afforded me some fun opportunities to make outrageous statements like these in all sincerity:

"well, I guess I should get off the couch now and go make the Earth"

"hey, check this out, I just found Jupiter in my pocket, I thought I lost it")

so even if the final necklace didn't quite match the vision I had in my head, it has been a fun experience of taking an idea from concept (thanks to Craig for the idea) to finished product
and anyway, I can always make another solar system tomorrow, LOL!

Monday, March 21, 2011

Cosmic Crafts

Can you guess what I'm making now?  There are several clues in the picture and I will tell you that  I am going to the California Academy of Sciences next week for NightLife, and hope to see the Planetarium show. 
did you guess??  No? Well, stay tuned and hopefully I'll post the finished item some time this week.

Aren't Magnolia's simply magnificent?  I love that they are one of the first ones to bloom this time of year.

Tuesday, March 15, 2011

Future's so bright I gotta wear shades

I've taken a gazillion pictures using my point and shoot camera. I've spent countless hours editing photos using Shutterfly, Picasa and GIMP (all free photo editing software downloaded from the Internet).  I've built my own photo box twice (really 3 times as I'm on iteration 2 of the current one).  And I still was NOT HAPPY with the strange colors and glare off my pretty little fire babies (beads).  

This is my current photo box, it's kind of hard to see with the blinding amount of light in there.  I literally wear shades when working in it, otherwise I get snow blind, LOL.  The box is made of foam core board from Staples, masking tape and 4 cheap clamp-on lights from Home Depot with "daylight" fluorescent bulbs.

Tonight I made a command decision that I would learn to use the white balance on my Nikon D-50, because I could and would master it's insanely complicated menu's, I'm an engineer after all, DAMMIT and no camera is gonna get the best of me!!

ROUND 1:
 This is the D-50 using a normal set up in the photo box with auto set White Balance. Note the slightly greenish cast to the background (Kosher salt crystals).
Nikon D-50 Auto White Balance in photo box
I like the GIMP software, but it's a GINORMOUS application and really slows my computer down so the the only feature I've really used so far is Levels.  Levels allows you to use an eyedropper to find a spot in the photo that's supposed to be white, the software then auto-corrects the color based on that selection (you can do this for black too, but these photos had no good matte black). The photo below is the same as above after Gimp level set.
Nikon D-50 Auto White Balance in photo box with Gimp Levels set
ROUND 2:
The last one above wasn't too bad, but I thought it could still be better using the D50 preset White Balance. After all that's the whole objective of tonight's little exercise.  This is after messing about with the camera for about 10 minutes trying to get it to set the white balance by putting a piece of white interfacing (fabric stuff, but kind of stiff and with a nice matte finish, shiny would be bad in this situation I think).
Note that the salt looks better, the greenish cast seen in the first photo is gone now.
Nikon D-50 Preset White Balance in photo box
 same as above after using Gimp to set the Levels
Nikon D-50 Preset White Balance in photo box with Gimp Levels set
definitely better (probably a little too bright, but that's a lesson for another day)

FINAL ROUND:
and for tonight's final exam; I used a card with a white side (coffee filter for the matte finish) and a black side (fabric scrap) so I could use the Gimp Levels to set both light and dark.  You can just see the edge of the card in the top of the photo, for actual posting purposes I would crop this out.
Nikon D-50 Preset White Balance in photo tent with Gimp Levels set for both white and black
And that concludes my photo experimentation for tonight.  Next time I want to see what can be done to reduce the light glare with some better diffusion, which will cut the overall light to the subject and may necessitate yet more exploration of the D-50 to figure out the best ISO, aperture, exposure adjustment and/or shutter speed.  Who knew that making glass beads would also require a major investment in upping the photo skills?