Thursday, April 23, 2015

AP update 04/19/15

We are waiting for the nitrogen cycle to commence before adding more fish.  The first batch of (10) 1.5" feeder fish died the first night, probably too much stress from cooler water temperature and higher pH than pet store.

When water is reasonably clear, nitrogen cycle is present and general water conditions (temperature and pH) are stable, THEN we will add more goldfish.  I don't think the family can handle another massive fish "friend" die off again.

Day 1 - Starting conditions 04/13/15
  • Temp:  55F
  • pH:  >7.6 (upper limit of test)
  • Ammonia: 0 ppm
  • Nitrite: 0 ppm
  • Nitrate: 0 ppm
  • kH: not measured

Day 6  - 04/19/15
  • Temp: 68F
  • pH:  >7.6 (upper limit of test)
  • Ammonia: 0.5 ppm
  • Nitrite: 0 ppm
  • Nitrate: 0 ppm
  • kH: 70 ppm

In the meantime, I added a seaweed nutrient to the water to get some plants started.  Poured in a whole bag (10.7 ounces) of Maxicrop powder (bag states 1 teaspoon/gallon, our system is ~ 250 gallons)

The Maxicrop turned the water to Guiness (ok, just the color and opacity of Guiness).  Research indicates this should clear up in a couple/few weeks as the plants take up the nutrients.

Planted yesterday and today.


4" starts from Home Depot (Bonnie brand)
  • Sweet Basil (Ocimum basilicum)- start harvesting at 4-6 leaf sets, annual
  • Sage (Salvia officinalis)- similar to basil, but lightly first year (year??)
  • Leeks (Allium ampeloprasum)- package: 80 days to harvest at 15-18" tall
  • Orange Bell Pepper (Capsicum annuum) - package: 70-80 days to harvest at 4-5" long peppers
  • Lemon Thyme (Thymus vulgaris) - snip stems as needed after it gets bigger, perennial
 Seeds from Botanical Interests
    Planted 2-5 seeds per piece of cotton ball, placed cotton balls just at grow bed high water line
  • Dwarf Blue Curled Kale (Brassica oleracea) - expect sprouts to emerge in 5-10 days
  • Spinach (Spinacia oleracea) - expect sprouts to emerge in 5-10 days 
     broadcast seeds on top of growbed, attempted to poke down any visible seeds, watered over top to help set seeds into media
  • Lettuce (Lactuca sativa) - expect sprouts to emerge in 5-10 days 
  • Arugula (Eruca sativa) - expect sprouts to emerge in 10-15 days  


Wednesday, April 15, 2015

Aquaponics Install Complete

We hit a major milestone in the Aquaponics Adventure this week.

First, let's just admire the lovely green concrete support blocks.  There was some skepticism in the household about whether or not this was a good/feasible idea.  I'm delighted to write that painting these was as easy as pie.

OK, now onto the important parts.  A good friend, Dr. McNie, assisted with the plumbing and a good thing that was too, she definately prevented what could have been some costly mistakes!  

I got all the parts from The Aquaponics Source Store to plumb a 3 IBC system.

It took a couple of days to get it all installed and tested.


Thanks to my guys, we got the lights hung up (the windows provide some light, but it's not really strong enough for robust plant growth).

and the beds filled with Coco-Puffs!

 Just kidding, the fill media is called Hydroton.  It is small balls of expanded clay.  This kind of media is ideal for the system has it lots of tiny crevices inside the balls, which will eventually get colonized by the beneficial bacteria that keep the whole system running.

and Voila!

Now we wait for the beneficial bacteria to colonize the system and start doing their groovy thing.  They turn ammonia (fish poop) into nitrates (plant food).

For the true geeks out there:

Nitrosomonas bacteria convert Ammonia (NH4-) into Nitrite (NO2-)
NH4+  +  1.5 O2  =  NO2-  +  2 H+  +  H20  +  84 kCal/mol of Ammonia

Nitrospira bacteria convert Nitrite (NO2-) into Nitrate (NO3-)
NO2-  +  0.5 O2  =  NO3-  +  17.8 kCal/mol of Nitrite


 for everyone else:
Ammonia and Nitrite BAD, Nitrate GOOD

Saturday, March 28, 2015

AP Construction continues

The AP system construction was interrupted last week as Aidan and I spent his Spring Break in California visiting family and good friends.

Aidan had a blast as Master Fire Poker


and Apprentice Pasta Maker

and Flying Trampoline Man


While I got to hang with the Beautiful People (one of whom is made of wax, I'll let you guess which one)


Meanwhile back home, the AP system is coming along slowly, but surely.

All the IBC's are cut and staged in the patio.  
 
A test fit of the 3 grow bed layout looks like a perfect fit!

The support blocks are painted and glued together (for extra stability, cuz water is heavy!).  I chose a happy green color for the blocks, in part because Aidan informed me that the all white walls were "so boring".  He approves of this color :)

Next is putting it all together using the kit of "special" PVC parts from the local Aquaponics Source store in Longmont.  I should only need to purchase and cut the straight runs of PVC pipe.

I'm really looking forward to the plumbing part, I think it's going to be like adult level Tinker Toys :)

Happy Spring!


Thursday, March 19, 2015

Aquaponics baby!

The aquaponics adventure begins.

A couple of years ago I read about a couple who had reworked their backyard pool from a leisure feature to become a nearly self-sustaining food production area.  They converted the pool to grow edible fish in the deep end, the fish water (nutrient rich with fish poop) is then pumped through vegetable growing beds. And they have some chickens in there providing yet more nutrients to the growing system.  From this they can sustainably produce their own vegetables, fish, eggs and the occasional chicken to eat.  You can read more about that here:
http://modernfarmer.com/2014/09/ground-gardening-going-deep-end-arizona/

I was very intrigued by this idea and have since researched Aquaponics (AP) like a mad woman.  Having always liked keeping aquarium fish as a hobby and a growing interest in vegetable gardening (pun intended) this seems like a cool thing to do.  From the moment we first saw our new home, I became obsessed with putting an AP system on our screened patio.

The patio is an ideal place to do this as it gets great morning sun and is fully screened to minimize garden pests (we have lots of rabbits, squirrels and racoons around here as well as the usual multitude of vegetable garden eating bugs).  Additionally, as the patio is big enough to accommodate a nice seating area as well as the AP system, the sound of running water will enhance the whole vibe.  And finally I'm hoping this will help us put a lot more fresh, organic produce on our plates.

The first step was preparing the patio. 

Original:


after much sanding, painting, reworking storm windows and minor electrical upgrades:

I know, it hardly looks different in the picture, but trust me it is much lighter out there now with the dark wood and red brick painted white. Also, we insulated the ceiling area to better hold in whatever little heat there is in winter to help the future fish tank temperature.

Now we are ready for the next step; setting up the hardware.  We have purchased 3 IBC (intermediate bulk containers) previously used to store agave syrup.  Each tank is 275 gallons.

The plan is to cut them up as follows:

IBC1 = 1 grow bed and 1 fish tank
IBC2 = 1 growbed and 1 sump tank
IBC3 = 1 growbed and 1 sump tank

The growbeds will gravity drain into the sump, the water is then pumped from the sump back into the growbeds and fishtank.  The fish tank will have an overflow siphon back into the sump tank.  This keeps the water in the fishtank at a constant height.

Aidan had a fine time rinsing out the tanks yesterday (grow bed and fish tank).


my new favorite tool:
It cuts through metal and plastic like butter!

Stayed tuned for further developments.


Monday, February 23, 2015

If you can't handle the heat ...

tear out the kitchen!

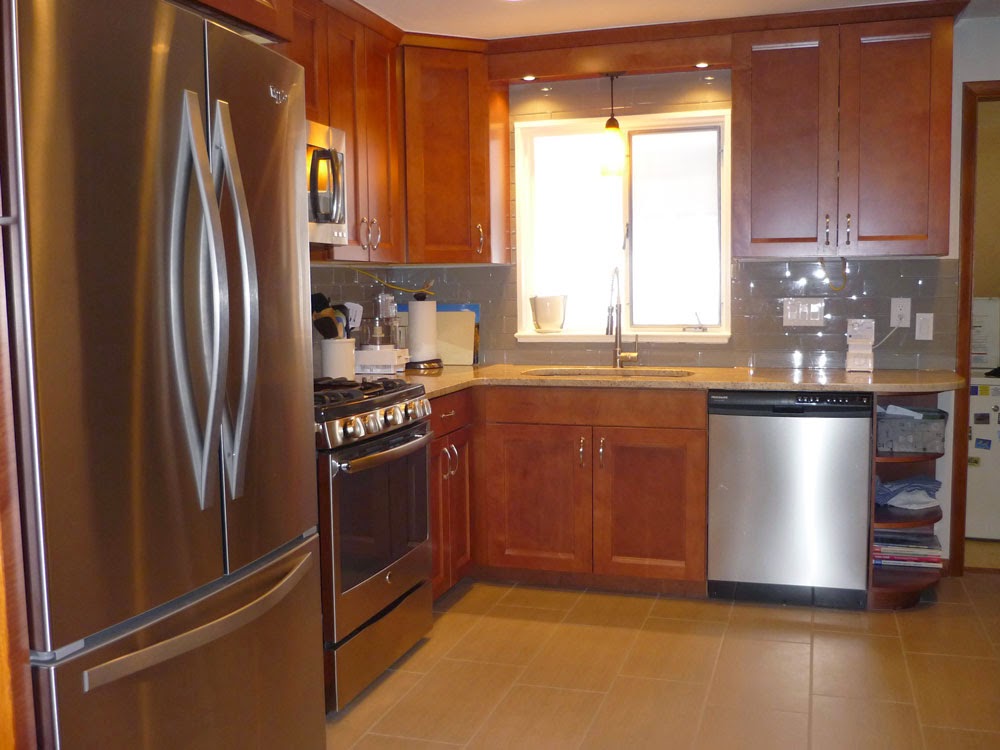
Some of you may remember that we started demolition of the kitchen way back a couple of weeks before Christmas.   We have finally gotten to the point I'm willing to share pictures of it with the world. Thankfully, our contractor friend was able to get us functional in early January.  The rather long delay is mostly due to my own    v e r y      s l o w      p r o g  r  e  s  s   on the final details (refinishing wood trim, painting, open shelves, etc). 

The kitchen at the time we moved in was barely functional.  The oven did not work at all.  The stove top only had 1 out of 4 burner that worked,  the remaining burners I took to naming; "DOA" (self explanatory), "Frigid" (no way to turn it on and knob ridiculously expensive to replace) and  "BurnMe" (only had 2 settings, "Not quite off" and "Incendiary"). 

Even the microwave, which looked to be a bit newer than the rest of the kitchen decided to join the list of the deceased a couple of months after we moved in a spectacular display of smoke and lights.  Oh how I grew to love my giant, rocket red, Crockpot, but that's a post for another day.

So without further ado, here are the pictures.

BEFORE:


AFTER:


We kept the same layout, only swapping the refridgerator and tall cabinet positions, but replaced pretty much everything: cabinets, appliances, lights and flooring. 

These are a few of my favorite things about the new kitchen:

  • everything works!
  • lights, lights and more lights! crucial as this room is literally in the center of the house and only gets natural light from a window onto an enclosed patio
  • more storage (we removed the old soffit and got taller upper cabinets)
  • granite topped seating area with open shelving on previously blank wall
  • electrical upgrade and way more outlets
  • sink large enough to bathe a small child (although I hope those days are over)

Off to make dinner now, Ciao.

Wednesday, November 19, 2014

Bronco Busting

Or, I should say, busting out the Bronco theme room.

As you may remember from my previous post, the former occupant of Aidan's room had rather feminine taste. So we undertook a good effort to make a cool, sports theme room for him.  He loves the Broncos and orange is his current favorite color.

We took down the fussy peach drapes, repainted the room in Bronco team colors, and got some cool IKEA furniture to provide a great play space and lots of toy storage.  I also refinished a thrift store dresser to match the room.  This is a room he can enjoy now with room to grow.

Before (with previous owners furniture):
  Now:

some of our favorite parts:

Team color dresser, thrift store find sanded, painted and sealed with poly for durability.  It's over-sized now, but with plenty of room to grow into.

Lego play area from slightly modified IKEA storage furniture. We cut the long shelf in the middle from MDF, sealed it with poly and have Lego mats on it (soon to be glued down).  We used 3 of the Trofast storage units to create the end pieces (2 are assembled as usual, then we used the sides from the 3rd unit mounted on the outside to create the supports for the shelf.  The shelf can be turned upside down for a smooth surface and moved up as needed)  The white storage bins contain the eighty bazillion Lego pieces he has collected to date with room for more.

My personal favorite is the "Secret Laboratory" area we created in the lower bunk bed area.  I installed an LED light strip (hard to see in pictures), which creates a ton of light underneath. Aidan picked out the fabric for the curtains, they have a flame pattern.

Closed during secret experiments:

Open for inspection and cleaning:

He is a happy little Broncos fan now :)

Tuesday, September 2, 2014

Home, Sweet, Home

We are getting all settled into the new home.  She is a lovely old home built in the 1950's with great bones.  The previous owner obviously took pride in ownership and cared for everything really well.  I have big plans to update and refresh this lovely old lady.  We also got a fantastic Mid-Century Modern (MCM) living and dining room set with the house and I'm pretty excited about using that as the design jumping off point for most of the rest of the house.  Very Mad Men, with a big dash of Scandinavian Modern (OK, really, mostly IKEA, but it sounds much cooler to say Scandinavian Modern).

We decided to start with Aidan's room.  Below is the before picture, pretty but not great for a little boy.


For this area I'm not really following the MCM theme, because Aidan couldn't care less about that and is much more in favor of a sports theme room. So we are doing it all up in Denver Broncos team colors (orange, blue and white). Aidan is a big fan!

Paint, paint, more painting and yet more painting is in progress.  I'm currently working on re-painting a thrift store dresser to match the theme. I'm trying something called "Chalk Paint" followed by Polycrylic in the hopes of getting a smooth finish over the slightly beat up wood, so far, so good.  I'll post more pictures when it's done.

Here is a link to learn more about Chalk Paint.
 http://blog.diynetwork.com/maderemade/how-to/make-your-own-chalk-style-paint/http://blog.diynetwork.com/maderemade/how-to/make-your-own-chalk-style-paint/