I had an opportunity to take the most awesome class ever called "Playing with Fire" at
Public Glass, San Francisco's Center for Glass Arts. I was feeling a little intimidated by the idea of being a complete neophyte in the middle of a "real artist's studio" and then I rolled up to this rather unassuming building in one of the rougher parts of town,
The whole experience was different and much better than I expected. The guys teaching the class were really relaxed and having a good time, which put myself and the other 5 students immediately at ease. I expected some crazy, super safety lecture and rigid rules of behavior for using the equipment. We merely signed a single sheet release form, grabbed some scratchy safety glasses and pretty much immediately started playing with molten glass.
We newbies were allowed to walk about freely and look at anything, and it became clear very quickly that everyone was VERY AWARE of where the red hot glass was AT ALL TIMES. The very real and apparent danger kept everyone on their toes without need for a lot of discussion of safety rules. One of the teachers likened it to the sort of dance that food servers naturally fall into when it's busy, calling out "behind you" and sidestepping around moving obstacles.
We set out to make simple, solid paperweights, actually blowing into the glass is another class entirely.
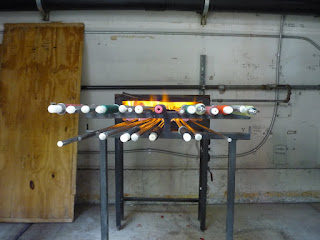
Step 1: The process begins with selection of a pipe, a 6 foot hollow metal rod to gather and work the glass with. The pipes are kept hot in a gas burner.
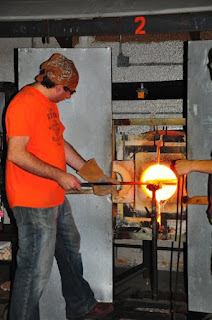
Step 2: Gather molten glass from the 2100F furnace, using the pipe to dip into the liquid glass, which is about the consistency of warm honey, gently rotating the pipe until a goodly size blob of glass has coated the end of the pipe. This was somewhat challenging as the furnace is so blasted hot you can barely stand to be in front of it and without dark glasses it was pretty much impossible to see where the glass was so this was somewhat of a "do it by feel" process.
Then cool the pipe in the former beer keg turned circulating water bath so it's possible to hold the pipe with bare hands
Step 3: shape the molten blob on the steel "marver" table to make the glass blob more cylindrical.
Step 4: As the glass is cooling it becomes harder going from the consistency of cold honey to taffy, so you have to keep the pipe turning at all times to keep the blob symmetrical and reheat frequently to keep it workable. The reheating is done in the smaller "glory hole" furnaces at each of the 3 workstations.
Step 5: Add color by patting the molten glass into various bowls of colored glass granules, sort of like adding a peanut coating to candy apples.
Step 6: Shape the colored glass so it creates swirls of color in the finished object, reheating as needed to melt the colored bits and keep the glass soft enough to work.
notice how the glass is getting darker as it cools off.
Step 7: add more clear molten glass from the big furnace to create a nice globe of clear glass around the swirly colored center.
Step 8: shape into final form using a wooden cup shaped tool that has been saturated in water to keep it from bursting into flame from the red hot glass.
Step 9: Create the "jack line" to separate the glass from the pipe. This is done by creating an indentation using giant metal tweezers in the blob close to where it is attached to the pipe. Then carefully dripping water onto the indentation to cool it down quickly and start micro fractures in the area. After that you suspend the pipe over something soft to catch the piece (someone with fireman's mitts for large delicate pieces or a padded cradle for the smaller pieces like the paperweights), then use the metal tongs to rap on the pipe which feels like a giant tuning fork and the resulting vibration causes the glass to crack apart at the jack line, thus separating the glass from the pipe.
Step 10: Gently place the first glass creation in the annealing oven and sadly wave goodbye as it takes 24 hours to cool down and I won't be back in SF for at least a couple of weeks.
Mine is the smaller, darker one on the right, it should be kind of blue and purple when it's all cooled down.


