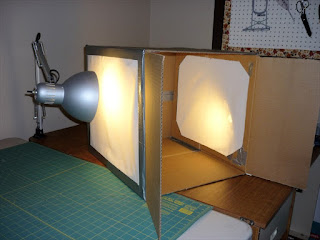
Photons, baby, I need more photons, and not just plain old ordinary photons, no, I need soft, diffuse, evenly dispersed photons for photographing stuff.
I came across this fun, easy tutorial for making your own, super cheap light box, http://strobist.blogspot.com/2006/07/how-to-diy-10-macro-photo-studio.html. I gave it a crack this weekend and here are the results.
Take any regular cardboard box, any size that's big enough to fit the stuff you want to take pictures of.
 | ||||
| regular cardboard box |
 |
| box cutters, scissors and duct tape make quick work of the rest. |
Now, just add some freshly pressed and starched plain white fabric, some people use tracing paper, but I think the fabric will stand the heat of the lights a little better with the added bonus of not as prone to tearing as paper.
 |
| tape translucent material to each side |
I made some comparison photographs using a few different lighting setups, normal and with the new lightbox using a few different background colors, oh yeah and they're from 2 different cameras:
- normal using 2 overhead fluorescent lights
- just on white poster-board with 2 overheads
- inside lightbox with lights on either side through side panel diffusers, on a white background
- inside lightbox, on light blue background
- inside lightbox, on a dark blue background.
normal room lighting conditions (weak overhead and 2 fluorescent task lights on swing arms)
 |
| Lumix, std light on table |
 |
| Nikon, std light on table |
same lighting, placing object on white posterboard.
just putting down a white background makes a dramatic difference in the photos
 |
| Lumix, std light on white |
 |
| Nikon, std light on white |
OK, finally with the new lightbox, on the same white poster board as above
 |
| Lumix, lightbox white |
 |
| Nikon, lightbox white |
now, same lightbox, this time with a dark blue background.
 |
| lightbox with dark blue background |
 |
| Lumix, lightbox drk blue |
 |
| Nikon, lightbox drk blue |
The lightbox made some improvements in the lighting, it was more diffuse and even, however the marble still showed the light glare pretty well. Maybe I should add another layer of fabric to diffuse it even more.
The light blue background (not shown in the photos above) was not worth the effort as I kept trying to color correct them to either white or dark blue. So, clearly, my mind's eye just doesn't like the "neither blue nor white" color scheme.
The dark blue background was also quite nice, the effect of the dark blue on the colors is interesting.
The camera comparison showed my trusty point and shoot Lumix can stand up proudly against the fancy Nikon digital SLR. I haven't practiced much with the Nikon, and I think the pictures reflect that. I like both cameras for different reasons, the Lumix actually fits in my back pocket quite handily. The Nikon is a sweet digital SLR that can take some amazing photos when I have time to dig into the manual.
As for the lightbox, I'll add more fabric to the outside and give it another go when I have something else to photograph, but for $10 this thing was worth it just for the entertainment value already : )
